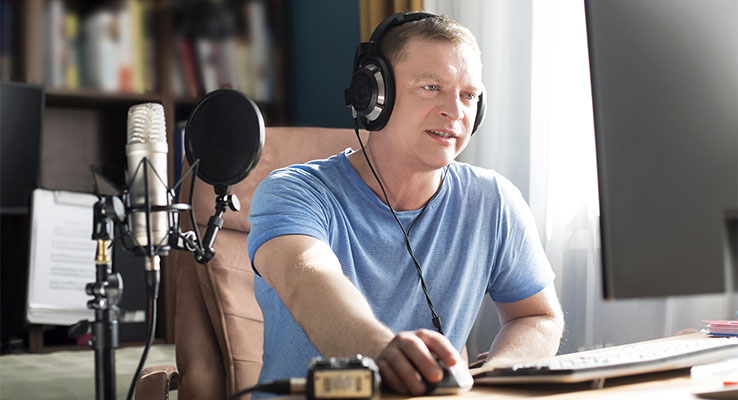
While hard work, practice, and a great voice heavily impact your career as a voice actor, so too does your voice over recording space. You may already have seen pictures of flashy pro studios online, but most beginners don’t get there overnight.
Growing your recording space into the studio of your dreams is a gradual process, and it usually happens through four main stages:
In this article
- First Stage: An Entry Level Recording Space
- Your First Microphone
- Audio Interface
- Digital Audio Workspace (DAW)
- Pop Filter
- Quality Headphones
- Computer
- Second Stage: A Permanent Space, with Room for Improvement *pun intended
- 3 Key Considerations when Upgrading to a Permanent Recording Space
- Third Stage: Semi-Pro Studio
- Fourth Stage: Pro Studio
- Structural Modifications and Soundproofing Design
- Noise Reduction Systems
- Analog Hardware
- Digital Converters
- Final Thoughts
- Stage 1: Entry Level Recording Space
- Stage 2: Permanent Recording Space
- Stage 3: Semi-Pro Studio
- Stage 4: Professional-Grade Studio
Keep reading for an in-depth look at what each stage of growth looks like and where voice actors—with any experience level—can make the next step for their recording space.
Before we hop right in, this video reviews the equipment you’ll need as you set forth with setting up—and improving upon—your voice over recording studio.
As we go through the four stages, we’ll look at how the gear you have in each phase changes, or doesn’t change!
First Stage: An Entry Level Recording Space
Often this first stage recording space is set up in a bedroom corner or a closet, is sound treated with what you have on hand or can find at a bargain, like thick blankets, extra mattress foam, or room bi-folds draped in other soft textiles to help with sound absorption.
Our in-house Audio Producer, Randy, tested out the varying degree of sound treatment provided by different “first stage” recording setups.
For a beginner studio, the price can vary depending on how much you want to invest right off the bat. Only spend what you need on voice over recording studio equipment until your books support the upgrades you’ll see in stage two.
Your First Microphone
Speaking of spending only what you need to, there are many entry-level mics that will allow you to capture solid audio recording and book voice over gigs. We hear often that while the mic is a critical purchase, “it’s not the mic” that books your work! It’s your vocal talents.
It’s not uncommon for beginners to use USB microphones to start off with since they’re easier to set up and the built-in hardware creates a digital signal, which means you don’t have to worry about purchasing an audio interface either. So, if you’re looking to save a little cash and want to dive in immediately, a USB microphone can do the trick for your entry level studio—but keep in mind that they come with their cons too:
XLR microphones are the other big consideration, and while they may require you to invest in an audio interface, they’re high-quality enough to last you through multiple stages of growth.
If you’re in a position to consider an XLR mic over a USB mic and want to explore more options, we put out a roundup of mics to consider in 2022, many of which will last you into the third or fourth stage of your recording space transformations.
While both USB and XLR microphones are suitable, there are a couple of mics we recommend you avoid using:
- Handheld mic/stage mic
- Mic attached to a gaming headset
- Webcam mic
- Handheld recorder
Audio Interface
An audio interface is what connects your microphone to your computer. It brings your voice recording into your digital audio workspace so you can edit and save your work. Audio interfaces typically cost $50 to $100 USD.
Digital Audio Workspace (DAW)
Thankfully, there are some fantastic free audio editing programs that can get you started. Many of the popular programs—like REAPER, Adobe Audition, and Logic Pro—have stellar online resources to assist you in learning the software quickly.
With so many editing software options available, this piece of the puzzle is just about finding your preference and what’s easiest for you to navigate.
Pop Filter
Pop filters are always important, no matter what type of space you’re recording it. We include it here to make sure it’s on your list of equipment to get when first starting out.
Some little sounds aren’t a problem until they pass through a microphone. It will save time and headaches in editing if “plosives” and other naturally occurring mouth noises are mitigated at the source. Investing in a pop filter goes a long way to improve your audio as you’re recording. It can cost anywhere from $5 to $30 USD.
Quality Headphones
When you replay your audio, you don’t want to miss a thing – including those subtle mouth noises that may go unnoticed otherwise. A high-quality pair of headphones can upgrade your listening experience, and help you tune into any little sounds you may need to scrap when you’re editing.
You can purchase a pair of good-quality headphones for $40-$80 that will be just right for this stage of your recording setup.
Computer
Another key tool in voice recording is the computer you use. Luckily, any computer that is 5 years old or newer is up to the task of being able to produce your audio files. Macs are well-known for being the leader in this area of work, but plenty of PCs out there offer high-quality performance. During the first stage or two, the computer you have will likely suffice!
Budgeting for the gear, on top of constructing your stage one recording space can begin to feel like a lot to manage financially. Here are some budgeting tips for your gear that will help give you more wiggle room with what you can afford to do with sound treatment in your entry level space.
Second Stage: A Permanent Space, with Room for Improvement *pun intended
After you’ve got enough experience in your entry level recording space and you’re ready to kick things up a notch, you’re ready to carve out a dedicated space in your home, and outfit it with your existing equipment, improved sound treatment, and soundproofing to create a full home studio.
Because there is an emphasis on improved sound treatment and soundproofing at this stage, now is a good time to get a refresher on the differences:
At this stage, your mic, DAW, and interface will suffice. Updating those items would be only if you felt you needed to based on what you’ve learned about how you operate as a voice actor.
3 Key Considerations when Upgrading to a Permanent Recording Space
- Find Your Space: You don’t have to move your studio if you’ve already got a great space you’re comfortable with, but this is a good time to assess the area and think about whether you’d like to move or not. Ask yourself the right questions. Are you in a room that’s susceptible to background noise and noise pollution? Is your recording space private enough for you to record audio?
- Get the Right Desk: Using make-shift tables might’ve been fine before, but if you don’t already have one set up, now is the time to get a desk to house your sound equipment. Any sturdy, spacious desk will work, but you can tailor it to your preferences–if you prefer standing up while you record, you may want to consider investing in an adjustable or standing desk.
- Focus on Sound Treatment: As you move into the second stage, it’s time to think about how you can improve the acoustics in your recording space, and hopefully, record higher-quality audio. The best way to do this is by focusing on sound treatments–like wall panels, bass traps, and diffusers–which can all make subtle but crucial differences.
Keep in mind that you don’t need to spend thousands of dollars during this stage just to improve your audio. Some additions can be a little pricey, but many of them can be purchased on a budget too. You may be able to find the right desk used or secondhand, and you can always create your own sound treatments by getting foam from a big-box store.
Third Stage: Semi-Pro Studio
Many of the adjustments you make to your home studio in stage two help lay the groundwork for a semi-pro studio, and while the upgrade isn’t always necessary, voice actors may move onto stage three once they’re a little more experienced. Not only does transforming your home into a semi-pro studio improve your audio but it can also appeal to clients as well.
Using professional, well-known gear can ensure your setup is more compatible with the clients you work with as well as make you a more attractive candidate, and can often be the reason a voice actor will choose to upgrade their DAW, mic, live-directed session capabilities, and more!
There are plenty of ways to upgrade your recording space into a semi-pro studio, but some of the most common ways include:
- Using passive absorption: One way to help eliminate excess sound and reduce your time in the editing process is by investing in passive absorption, which helps eliminate unwanted reflections, lower reverb time, and preserve the quality of your audio.
- Upgrading your equipment: When they’re ready to transform their recording space into a semi-pro studio, most people upgrade various parts of their setup. Maybe you’re trading in a slow, outdated laptop for a new Macbook or switching from a USB microphone to an XLR mic. You may not be able to upgrade or even need to upgrade your entire setup, but this can be the right time to make adjustments.
- Investing in a power conditioner: As you add more cables and cords to your setup, a power conditioner can ensure there’s no electromagnetic interference and that your electricity is safe and consistent.
Besides these upgrades, there are a few more tools you might want to consider for your studio, such as:
- Audio plugins (Like iZotope RX7 or 8)
- Microphone preamp (either a multi-channel preamp or a high-quality single-channel preamp)
- Virtual instruments
- Control surface
Fourth Stage: Pro Studio
For many voice actors, there is no need to go beyond stage three–they’re booking their ideal gigs and are pocketing the profits because their gear is paid off! With the right upgrades and plenty of skill, a semi-pro studio is more than enough to support the success of a full time voice actor.
However, if you’re looking to go above and beyond as a voice actor, the final stage of growth is a pro studio. For beginners or anyone just starting out, there’s no need to rush into creating a studio of this calibre–but if you’re a seasoned professional that wants to step up your game in the audio business, this can be the way to do it.
Pro studios don’t always look drastically different from semi-pro studios, but like the sound treatment improvements that have been discussed in the preceding stages, sound treatment and soundproofing are a major component to this forth and final recording space phase.
Structural Modifications and Soundproofing Design
Much of what sets the pro studio apart from the other stages is that the physical space has undergone some intense construction to install true soundproofing—not sound treatment—that keeps external noise completely at bay.
Consider the vibrations that take place between the layers of drywall caused by external noise for instance. Adding extra layers of drywall with Green Glue sound reduction compound and adding extra insulation will help tremendously.
A commonly referred to turn-key studio build that offers some high quality sound proofing are the Whisper Room studios. There is a lot to learn from their builds, like how they control for ventilation sound within a recording space.
Along with upgraded structural soundproofing, other tools that you may find in a pro studio include:
Noise Reduction Systems
If after the structural upgrades, you still have unwanted ambient noise leaking into your space, you can invest in a noise reduction system like the one we used in the Voices studio.
Analog Hardware
Most newer voice actors aren’t familiar with analog hardware for mixing–nor will most gigs require them to be–but this is one addition that some seasoned pros like to make to their studio. Digital software and plugins will always be the most convenient way to mix your audio, but some voice actors swear that nothing sounds better than analog hardware.
Given how expensive analog setups can be and how inefficient they are compared to digital software, this isn’t a necessary investment–but is one addition that you’ll find in some of the top professional studios.
Digital Converters
Your audio interface can take care of converting your audio from your mic to your computer, but in some high-end professional studios, voice actors take it a step further by investing in a separate digital converter. This is separate from your audio interface, and while it’s unnecessary for entry level or permanent home studios, you may want it for your pro studios so you can have the highest-quality digital conversion possible.
Final Thoughts
Whether you’re a beginner or a voice actor who’s still finding their footing, it’s important to remember one thing about this industry: high-end equipment and a great voice over recording studio may give you an advantage, but your practice, hard work, and natural talent will be the real key to your success.
Don’t assume that you’ll need to spend thousands of dollars on fancy equipment just to book a gig–many voice actors start their home studios out of their bedroom or closet with basic tools, and if you’ve got skill, that’ll be enough to get your foot into the door.
The rate at which you grow your recording space depends on you, your budget, and even your goals. In the end, a studio has a wide price range of between $300 to $30,000. Your preferences for equipment and renovations can drastically impact the cost.
If you’re just pursuing voice acting as a hobby, you may never need to grow out of that entry level studio. But if you’re trying to become a full time professional who tackles big jobs, you may eventually decide to upgrade to a semi-pro or pro studio.
Leave a Reply