Have you been wondering about how you can record your voice with Apple’s GarageBand? GarageBand is an easy-to-use audio recording software, which makes it a great way to produce your finished product, whether that be a demo or audition.
Put Your Voice Over Skills to Work
Create a free profile and start getting invited to jobs. Over 5,000 jobs posted monthly.
In this article
- What is GarageBand?
- A Step-by-Step Guide on How To Use GarageBand on a Mac
- Step One
- Step Two
- Step Three
- Step Four
- Step Five
- Step Six
- Step Seven
- Step Eight
- Step Nine
This tutorial will lead you through the nine-step process of how to use GarageBand for voice over, from creating the initial project to ensuring that you have the right settings for your microphone in preparation to record, and everything in between!
What is GarageBand?
GarageBand is a versatile and user-friendly digital audio workstation developed by Apple for its Mac computers. It serves as a powerful music creation software that caters to both beginners and experienced musicians. GarageBand provides a range of virtual instruments, including keyboards, guitars and drums, allowing users to create musical compositions without the need for physical instruments. It features a user-friendly audio interface with a variety of pre-recorded loops and samples, enabling users to easily piece together professional-sounding tracks. Additionally, GarageBand supports recording live audio, making it suitable for musicians looking to record their performances. Whether you’re an aspiring musician or a seasoned pro, GarageBand on Mac offers a creative platform for music production and exploration.
GarageBand on Mac is also a common audio interface that’s used to record voice tracks for podcasts and other voice audio projects by providing a straightforward, simple and intuitive interface, that allows users to connect a microphone, easily capture vocal performances and enhance recordings with a range of built-in editing and effects tools. If you’re a voice over artist and have a Mac, it’s a valuable tool that could help you with your career.
A Step-by-Step Guide on How To Use GarageBand on a Mac
Before you get started, check your Mac desktop or laptop to see if you already have GarageBand installed. If not, download GarageBand from the App Store. The software is free for all Mac users.
Step One
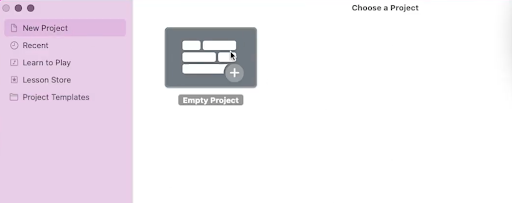
Open GarageBand by double clicking on the icon on your dock. Begin by selecting “New Project from Template and then “Voice” for an audio recording.
Note: You’re better off choosing “Empty Project” from within the “New Project” option rather than from the “Project Templates” because those templates all include processing effects. As a voice actor, you want to be able to control what’s applied to your audio.
Step Two
Double check that the input device and output device are both set to your microphone.

Then click “Choose.“
Step Three
You’ll see the “Choose a Track Type” box. Select “Record Using a Microphone” under the “Audio” options.
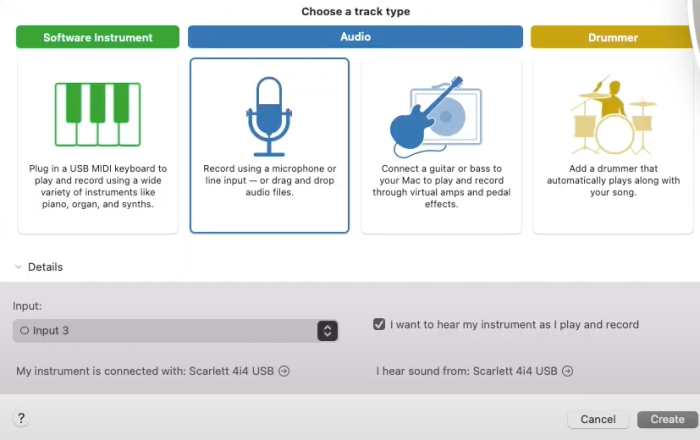
From the expanded details drop down menu, ensure that you set your input to the correct one that will bring your mic into GarageBand. (For us it was Input 4, but may be Input 1 for you.)

Note: Always check the box that reads “I want to hear my instrument as I play and record.” It will allow you to hear your performance through your headphones without any delay.
Click “Create.”
Step Four
Now that you’ve loaded a session in your new empty project, you can speak into your mic and see GarageBand picking up your voice.
Before moving ahead with the recording, let’s declutter the session screen by using these hotkeys: Y, E, K, Shift+K.
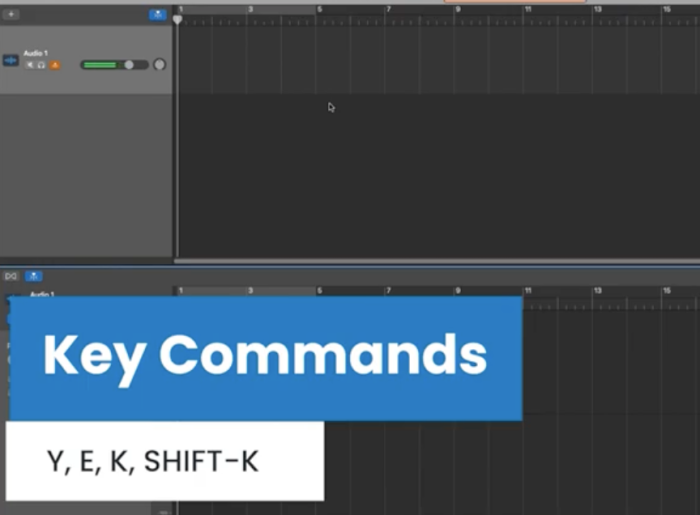
Hide library with Y
Hide effects with E
Turn off the metronome with K
Turn off the “count-in” with Shift+K
These features of GarageBand may be helpful to someone using it for their own music production but for voice over purposes, they can be hidden to free up the screen and make it simpler to work with.
Step Five
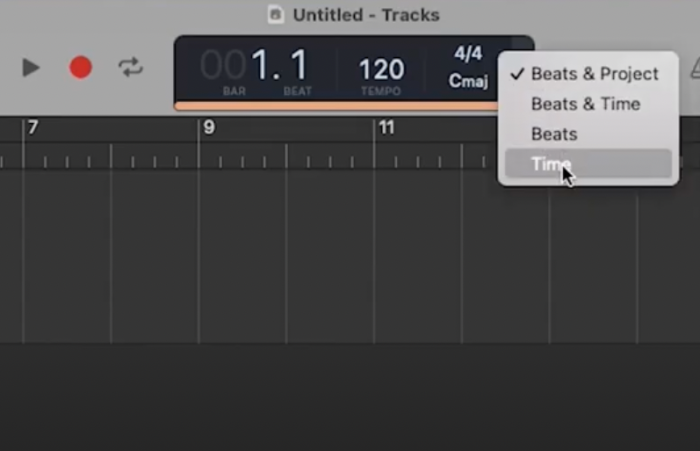
Change the session parameters to time. By default, it’s set for bars, beats, tempo and key signature. Again, that is more for music production and can be changed to be more “voice over session” centric by changing it to reflect time.
Step Six
Use the full real estate of the screen to see both a zoomed-in and zoomed-out view of your recording.
Zoom in the bottom row so you can have a more detailed view of your track to make the editing process easier. You can do this by clicking and grabbing any bar within the recording area and dragging it outward to “stretch” it, effectively zooming it in.
Leave the top row zoomed out.
Optional:
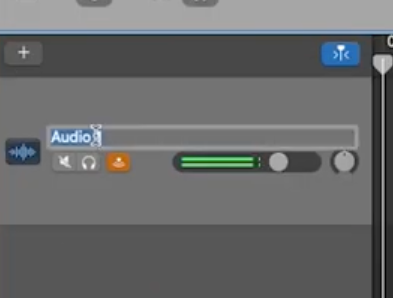
Each GarageBand track has a track header. This displays the track name and icon plus a number of track controls.
You can change your audio tracks to specific names which can be especially helpful if you’re working with music overlay or multiple audio tracks. This may help with your organization.
Step Seven
You’re ready to record!
Hit the red circular “Record” button at the top of the screen when you’re ready to start recording.
As Randy explains in the video above, having the zoomed-in view along the bottom of the session screen gives you more detailed information about the captured audio. You can zoom in even more so to see where specific moments of your recording can be edited when you begin playing them back and considering what editing needs to be done.
Step Eight
Make your edits!
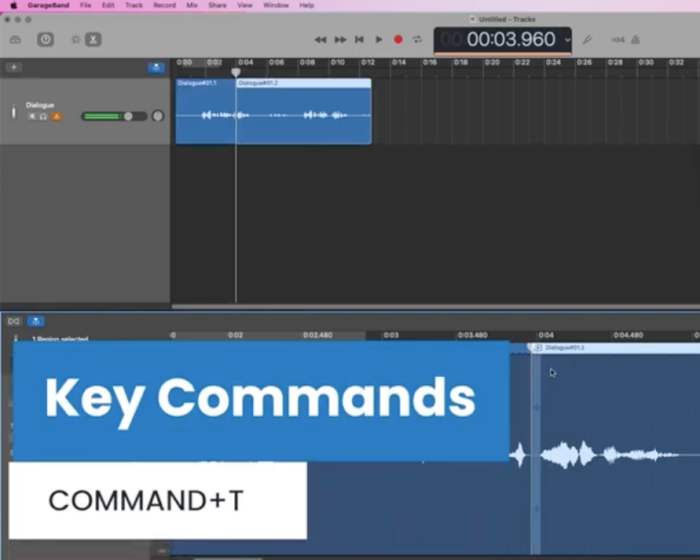
After playing back your voice over takes, you’ll likely prefer aspects of one read more than others. Because you don’t have any additional processing effects on the audio (and you’re in a decently sound treated space, right?), you can cut the audio apart and seamlessly bring together the parts of your reads you preferred the most.
Tip: Command+T is the hotkey for creating a break in the audio that will let you easily drag and drop it wherever you need within the audio track.
Step Nine
Be sure to clean up the audio track so that there’s no unnecessary recording time on it that might impact the client’s decision in hiring you, especially if you’re recording an audition. You want the best sound quality possible.
Trim off any dead air at the beginning and end of the audio so that your voice begins just moments after a client hits play and ends just before the track concludes. And don’t forget to save your GarageBand project file.
That’s it! Now it’s your turn to create a new audio track and your own GarageBand projects. Head into GarageBand now to test out our walkthrough on getting started and let us know in the comments below how it worked out for you!
Ready to start finding voice over work? Sign up for an account on Voices today.
Comments
I’m glad you’re doing this. I’ve been using Garage Band (self taught) and will be interested in seeing new details.
I’ve had two issues:
1) Just recently, even though my Snowball is plugged in and selected, the computer has reverted to the built-in mic. I seem to have unplug and replug the Snowball to get it to work on a particular GarageBand file. Then when I switch to a new garageband file, the same problem happens. This never happened before this week. Before, I’d plug in the Snowball and it would stay the chosen mic throughout my work.
2) On occasion, I open a GarageBand file and find that one or more audio segments are suddenly blank. As a result, I never quit or close a file until I’m sure the mp3 output file is OK and ready to submit. Or, if I have to leave, I’ll make an mp3 output file so that I can import it if I find something amiss with garageband when I return.
Any suggestions?
I have OS 10.6.5.
Hi Jack,
I also use Garageband and I have a couple of suggestions that may help.
Firstly, for general troubleshooting using Garageband, a PRAM reset (or zap) may help. It’s very simple, just google “zap PRAM” and you can find instructions.
Secondly, regarding saving work in progress, it might be better to save an AIF (uncompressed) rather than MP3 file. You just uncheck the “Compression” box when you share the file. You can import it into Garageband later just like an MP3 but as it’s not compressed it is a better replica of your original recording. If you import an MP3, work on it and then save it as an MP3 again you will have compressed it twice which can have some unwanted side effects.
Thanks for this article, my new Mac and I are anxious to start applying your advice to make some practice demo clips! I look forward to your other installments.
Hi and Thank you for this Article,
I was wondering if there was an update to this article as Mac has updated to Yosemite and Garageband has updated to vs10.1.0. The interface has changed a little and I’m trying to learn Garageband while trying to refer to the old images. Guidance in the right direction would be immensely appreciated.
Thank you,
Jim
Would love to see a video on using GarageBand on a 2021 iPad Pro and a usb mic.
Hey Raulgongora,
Thanks for your comment! That’s a great idea. I’ll pass along your suggestion to Randy, our content producer, and see if we have any plans to get into nitty gritty videos showing how it operates with different gear.
Thanks again!
Niki