For voice actors, becoming more efficient in the studio means completing auditions quicker, thus responding to more job postings, and increasing your hire rate. This is where productivity translates into dollars!
The productivity and time management tips that voice actors use in the studio tend to align with the level of knowledge they have in their recording software. In knowing the capabilities of the software, you’re more likely to take advantage of the efficiencies built into those programs.
In this article
- 6 Tips for Voice Actors on How to be More Productive in the Recording Studio
- #1 Batch Process Audio Recordings
- The Option of Using a Media Encoder
- #2 Make Noise Reduction Processes Easier
- Use a Post Production Audio Suite for Audio Repair and Noise Reduction
- #3 Use the Zoom Function
- #4 Keep a Computer Monitor in the Booth
- If a Monitor Won’t Fit, Use an iPad or Tablet
- #5 Take Advantage of Markers in Your DAW
- #6 Make Use of Audio Editing Hotkeys
- Zoom Hotkeys
- Marker Hotkeys
- Fastforward and Rewind
- Shortcut to Edit Points
- What Productivity Tips do You Have?
For example, programs like Logic Pro, Adobe Audition, and Pro Tools come with audio recording templates and audio presets.
Presets and templates are powerful tools that many voice actors use to increase productivity. For instance, voice actor Tyler Boss says:
“Set up a very light compression, subtle EQ, de Esser and noise gate as a preset in Audition.”
But these tools are just the start. There are many more productivity tips that can save you time in the studio all while setting up your voice over business for maximum success.
6 Tips for Voice Actors on How to be More Productive in the Recording Studio
Often times, the process of recording individual auditions and submitting them one as one-offs can actually hinder a voice actor’s productivity. That’s why this first tip comes highly recommended by many voice actors from a Voices survey on productivity.
#1 Batch Process Audio Recordings
Simply put, batching processing refers to recording and exporting many audio files at the same time, to save time.
Recording and exporting auditions in batches helps voice actors to ‘stay in the zone’ and record various scripts in one session. Then they move onto editing, and eventually, exporting the audio files in a single batch. Making batch processing a part of your workflow can be the difference between auditioning for 4 jobs or 7 jobs in a day.
Depending on the digital audio workstation (DAW) being used, the size of the audio files, and the processing power of your computer, rendering these files one-by-one can be time consuming. It can create a lag between submitting an audition and moving onto the next opportunity.
The Option of Using a Media Encoder
Not all productivity tips work well for everyone. If you feel like batch processing slows down the rate at which you’re able to submit auditions, the other option is to use a media encoder program like Adobe Media Encoder.
Typically, upon export, a DAW will become unusable for the duration of the export. With the help of a media encoder program, you can render a file through it while keeping your DAW free for more recording and post production work. Because you’re not exporting through the recording software itself, it’s available for you to continue recording one-off auditions and submitting them as you go.
No matter which option you choose – batch processing, or employing a media encoder to continue with single file exports – either will make you more efficient and enable you to audition for more voice over jobs.
#2 Make Noise Reduction Processes Easier
Background noise is unavoidable. Causes of background noise can range from a hum in the room, to footsteps from upstairs, to the plosives, sibilance, breaths, and lip smacks you make. All of which need to be removed before an audition is submitted. Luckily, there are ways to save time when it comes to reducing or eliminating these unwanted noises.
Use a Post Production Audio Suite for Audio Repair and Noise Reduction
Voice actors who answered our productivity survey gave several recommendations, including using a post production audio suite like Izotope RX. This software specifically offers a highly intelligent De-noise plugin that removes any unwanted noise from a vocal recording.
This company also offers other plugins such as De Wind and De Rustle that provide another awesome layer of noise reduction.
#3 Use the Zoom Function
To make more precise edits when working in a DAW, don’t underestimate how important zooming in can be. When edits are made to an audio file without a nice close-up view of the audio waveform, they tend to be more ‘blunt’ and noticeable. Plus, trimming away more than necessary can hinder the real-life component of the voice over read.
Voice Actor Shawn Maroney says “Zoom is your friend. No re-records or fine tuning necessary.”
In every digital audio workstation, zoom can be applied both horizontally and vertically.

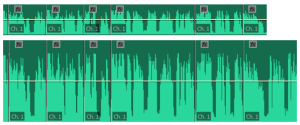
Horizontal zoom compared to a standard view:
Vertical zoom compared to a standard view:

Each type of zoom serves its purpose. The horizontal zoom allows voice actors to see more granular details of the waveform, which assists them in locating the exact moments when breaths or lip smacks occurred. This is a great way to ensure you’re not editing away too much of the audio and accidentally creating that ‘blunt’ edit sound.
A vertical zoom is often used to identify the peaks of recorded sound within a waveform. It helps you get a visual of any strange ‘audio blips’ that were picked up while recording.
Sometimes, in a recording session, voice actors will clap loudly to create a spike in the audio waveform to help them locate a specific time within the track. This is a proactive way to mark a moment in time that you know you’ll need to visit in the post production stage. The spike created by the clap is very easily noticed with a vertical zoom.
#4 Keep a Computer Monitor in the Booth
If your studio allows for it, try getting a monitor into your recording space to use for reading scripts from.
When surveyed on how they up their studio productivity game, voice actors responded with the helpful tip of ‘using a computer monitor in the studio.’
Voice actor Tamara Linke described the assistance that the monitor provides as ‘freeing up space,’ and ‘making projects more manageable’:
Prior to installing the monitor I was working off my phone to read the auditions which was much too small and was endlessly frustrating! Printing copy to paper was just less productive and would create less room in my studio if I had to use a stand. The monitor is perfect as I can just read the screen and scroll as I go. Most studios I visit have this set up so this was a natural progression in updating my home studio. It came in handy the other day when I was in a directed session with a Turkish company for a gaming VO, and I had to use my phone to Skype. It would’ve been nearly impossible, and awkward, if I had to use my phone for reading the script and Skyping!
If a Monitor Won’t Fit, Use an iPad or Tablet
If you’re looking for a way to avoid using paper scripts, but your studio is cramped for space, there is always the option of using a tablet or iPad. It will provide the added functionality of a larger screen that you can read from and scroll with, but will reduce the amount of space accommodation required.
#5 Take Advantage of Markers in Your DAW
All popular DAWs offer the ability to drop markers throughout an audio track. These markers can be especially helpful in the post production process.
Voice actors who use the same session to record many auditions can drop markers on the start and stop of each audition to help denote exactly where the audio for a particular audition is, and with the information in the marker, know exactly which audition it is as well (which client, which take, etc.).
Another use case for markers is in instances of long form narration. Voice Actor, Tyler Boss perfectly explained how the use of markers has positively impacted his post production process:
When I’m sitting down to do a narration, eLearning project, or audio book, I always have my trusty dog training clicker [a hand-held device that makes a clicking sound picked up in the recording] in hand. As a new “slide” or chapter pops up on the script, I hit the clicker twice. This tells me that it is a new slide. In Adobe Audition, I can see the double taps of the clicker in the audio. I simply highlight the VO in between the clicks and hit the “m” key. It creates a marker in the file. Then, I simply edit in between the markers. Then, I rename the markers with the filenames the client has chosen and export! Using markers (and the dog clicker) has cut my editing time by at least half.
#6 Make Use of Audio Editing Hotkeys
Voice actors recommend using hotkeys as a way to make your studio time as productive as possible.
What are hotkeys?
Hotkeys are shortcuts that with a key stroke combination enable a function to happen, avoiding the need to navigate through menus. Common shortcuts are Shift+C to copy and Shift+V to paste.
The physical hotkeys will differ from one software package to another, yet each program will allow similar functionality in the programming of hotkeys. Here are the most popular hotkeys that voice actors find themselves using.
Note: Some of the above studio productivity tips can be accessed through the use of these hotkeys!
Zoom Hotkeys
Zoom hotkeys help you to achieve both the vertical and horizontal zooms as discussed above. Often times, vertical and horizontal zoom are used in conjunction, so employing these hot keys will help you quickly and easily adjust both zooms to exactly where you need them.
Marker Hotkeys
As we know, markers are a powerful asset in the post production stage. Upgrade your marker-dropping game by using the marker hotkeys to insert them in wherever and whenever you need them!
Fastforward and Rewind
You can use hotkeys to not only fastforward and rewind, but also to set the speed at which you fastforward and rewind. There are no one-size-fits-all solutions in the audio production industry. So why settle for the run of the mill speeds when you can control them in the moment?
Shortcut to Edit Points
So you’ve sliced your audio track into individual audition tracks. The edit points from that exercise are now present and you’re on to the more granular bits of the post production process. Rather than mousing from one track to the next, use a hotkey to help you toggle more easily.
What Productivity Tips do You Have?
There are certainly many more productivity tricks that voice actors are using in the studio! If you’ve got a process or tip that helps you make the most of your time in the booth or in the post production stage, let us know in the comments below.
The biggest productivity tip for voice actors, audio editors and music producers? Gaining access to new freelance gigs through Voices. Sign up for your free account today if you haven’t already!

Leave a Reply