When it comes to the world of home recording studios, there’s one brand on the tip of everyone’s tongue: WhisperRoom. And for good reason—these high-end studios are known for their portability, superior ventilation, and solid sound treatment.
However, these isolation booths are also a significant investment, to the tune of thousands of dollars. For many voice actors, their wish will come true in 2024 as they work up to purchasing their dream WhisperRoom. But for others, the WhisperRoom might be slightly out of reach.
In this article
- How You Can Build a WhisperRoom-Inspired Recording Studio
- Research WhisperRoom Designs
- Decide What Elements of a WhisperRoom Are Important to You
- Do a Virtual Mock Up Before you Physically Build it
- Is WhisperRoom on your Radar?
If the price tag is still feeling a little bit steep, but you know you could step up your game with a sound booth as great as the WhisperRoom, consider an interim solution: Making your own isolation booth. It’s a great way to hold you over until a genuine WhisperRoom can be yours!
How You Can Build a WhisperRoom-Inspired Recording Studio
With a bit of woodworking, DIY project experience, and the space in which to build, you can take the process that voice actor Marc Hayes used to assemble his WhisperRoom-esque recording space. Here are 3 steps to getting started on building your own WhisperRoom:
- Research WhisperRoom designs
- Decide which elements of a WhisperRoom are most important to you
- Do a virtual mock up before you physically build it
Research WhisperRoom Designs
Go into your research with some rough measurements of your own space first. It’s important to make sure you know how much room you’re working with and it will help you to narrow down which WhisperRoom designs make sense for your space. If you only have a 4ft by 5ft space like Marc, there’s no need to dive deep on rooms measuring 9ft by 8ft, right?
The WhisperRoom makes all of their designs available, along with all of the specs and internal equipment used. They know their value and sit comfortably with that information being public because the final product is a marriage of benefits otherwise difficult to come by in a home recording studio—and, of course, not everyone feels up to the project of building one for themselves! Take a look through their catalog to see what design makes the most sense for your space.
Beyond finding a design to work with, you can also do online searches for ‘DIY WhisperRooms’ and other similar queries to find other examples of people who have done what Marc has. Learn from their stories and be mindful of their advice.
Marc did three to four weeks of research before purchasing any materials and he advises other voice actors to do the same.
“Do your due diligence. Look at what others have done that worked and what didn’t work. Don’t just look at successes because you might get great ideas from those who have failed as well, honestly.“
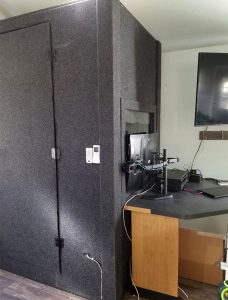
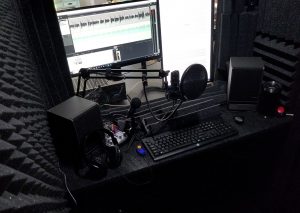
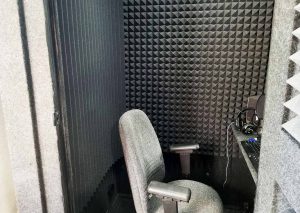
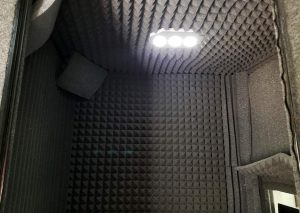
Here are a few pictures of Marc’s final product:
Decide What Elements of a WhisperRoom Are Important to You
We mentioned above that three of the main benefits of a WhisperRoom are:
- Ease of assembly and portability
- Superior ventilation
- High quality sound treatment
Yet, when building your own, you can decide if all three of these benefits are important to you or not. Perhaps you’re comfortable creating a more permanent space for yourself. Portability may be less important in that case.
Maybe you’re an audiobook narrator, in which case ventilation may be at the top of your priority list as you spend long stretches of time in the booth.
The WhisperRooms are not technically ‘sound proof.’ Because of their portability, they experience air-borne and structure-borne sound leakage. So if soundproofing is your goal, you can make that your priority when constructing your replica.
We needed to pay close attention to our soundproofing when we built our in-office recording studio. Here’s how we handled soundproofing in a noisy environment:
In any case, you can customize the booth to your needs.
For Marc, the appeal of the portability really stood out to him. So he constructed his with ease of assembly and disassembly in mind. Rather than having green glue in between the panels or other treatment that makes for more permanent situations, the sound insulation is secured with velcro and the structure is simply screwed together.
Do a Virtual Mock Up Before you Physically Build it
Beyond researching the initial design, you’ll also need to research the actual construction of the booth.
For Marc, that meant using a free CAD-style program called SketchUp where he was able to create 3D versions of the booth online. According to Marc, this was instrumental in keeping costs low and making it successful on the first try.
“Using the SketchUp program helped a ton. I knew exactly what I needed, in the exact sizes beforehand. Mocking it up ahead of time was crucial. The program is easy to figure out too, but either way, there are tons of tutorials on how to use it – I mean, that’s what Google is for.“
Tip: Never heard of SketchUp? Here’s a resource for finding a free CAD program that works for you.
Marc said he decided to use MDF (medium-density fibreboard) just as WhisperRoom does, and thanks to SketchUp, he knew exactly how many boards of each size would be required to build his booth. Next up was understanding how much sound proofing material would be required and any other features he wanted to incorporate, like a window and how he wanted to construct the booth door. All of these queries were easily addressed in SketchUp.
“Because of the pre-planning and research, there were a bunch of different iterations [of the booth]. Once I had my base, the research went more into finding the product I wanted to use. And then finding the best price.“
All in all, Marc wants other voice actors who are considering this type of project to have confidence in themselves ‘to just try it’. Preplanning will be the key to your success, but having the confidence to attempt it will be what ultimately gets you started.
Is WhisperRoom on your Radar?
If the WhisperRooms are on your wishlist, go check out their catalog to purchase the perfect one for you! Still saving up? Investigate building a sound booth for yourself in the meantime.
Have you taken on a similar project? How’d it go? Let us know in the comments below.
And, of course, if you’ve got a stellar booth setup and are looking to book more work, sign up for an account on Voices to get access to voice over gigs from all over the world.
Comments
Good article. When I moved house in 2014, I got a joiner to build me a small voiceover booth within a study room within the first week. It’s not perfect and not 100% soundproof but it does the job…and at a cost of about £750 including decent acoustic treatment, fire door etc, it was far more affordable. Paid for itself in no time.
Hi Paul – thanks for sharing. Sounds like a solid investment, plus you saved money on the build! Awesome!
This is really impressive – looks professional! I modelled mine on a hearing test booth.
It’s a strange feeling shutting out all of the noise isn’t it? Therapeutic almost. Anywho I digress, thanks for sharing the article, really enjoyed it!
Excellent article! I’m about to convert my single car garage to a double and use it as a studio. I’m a drummer so soundproofing is a top priority. I was considering building my own vocal booth as well. Can you share where you purchased the exterior gray material on the walls? That looks so great!
Hey Gary,
Thanks for your comment! Your best bets for vocal booth acoustic foam/absorbing material are probably with Sweetwater or Amazon, or directly from a company like Primacoustic.
Love the article! I was curious what the grey exterior covering you used is called? I’ve seen it on a bunch of booths but can’t seem to get a concise answer on what it is? Thanks!
Hi Jack,
Thanks! The grey exterior covering is generally called vocal booth acoustic foam and/or absorbing material.
I’m just starting out, so I built one out of pvc and moving blankets for now. Not the best but better than not having it. I can upgrade as I grow by replacing the moving blankets with acoustic blankets or potential acoustic foam.
Where fid you find the
MDF (medium-density fibreboard) ?